Friday, 25 January 2013

A Beefy Treat for My Dog & Me

I have been sick with a cold for the whole week.  I hate feeling so bad without having a fever to justify sniveling… now that I’m alone, I have no one to snivel to except Cody, who doesn’t really care LOL.

Today  I asked my sister to drive me around town to get the traditional cold medications, as waiting for the cold to go just wasn’t cutting the mustard after 5 days. 

On my to do list in town was…

  • to buy a new face shield for my motorcycle helmet (no more cold drafts for me!)
  • get the batting for the quilt I had wanted to make and finish when I was fifty (yikes! I only have a few months to do it if I want to get it done before I’m fifty-one!)
  • buy some round roast to make jerky for me and Cody.

DSC02007

I have 4 1/2 trays of jerky in my Excalibur dehydrator as I type this post…. I also made 3 single portion packages of seasoned “minute” steak out of the heal of the roast I sliced.  Doing something like this has made me feel better, just thinking that I’ve accomplished something! Ok, that and the drugs are starting to work LOL.

Monday, 21 January 2013

Cheery Flowers to Pick You Up!

Welcome from the Card a Day Blog!

This week’s theme is Get Well Soon.  For what cheers me up when I’m feeling under the weather, there is nothing better (except perhaps for chicken soup) that cheers me up like flowers or cheerful colors!

I made this simple card in a flash, using the print and cut feature of my silhouette cutter.  The tulip bouquet was from the silhouette store. I cut extra bow and flowers from the shape so I could attach them with dimensional adhesive, so they could pop out a bit.

getwellsoon jan 21

I added some “bling” with metallic markers and glitter pens, and a wavy faux stitched line across the card. Simple, but just enough to add some pizzazz!

DSC02005


Remember to check back tomorrow at the Card a Day Blog for some inspiration from Lucy Kelleher!


Join our challenge there too!

Tuesday, 15 January 2013

Simply Thanks

I’ve been blessed lately with having to send out some thank you cards… I thought I would share a quick and simple one I made with you.
It is composed of four things…
  1. 6 inch square white card stock card.
  2. 5/8th inch olive green satin ribbon.
  3. K&Company Die Cut Sticker Alphabets
  4. K&Company dimensional stickers (Irises!)

DSC01997
I wanted the “thanks” offset, so I started right to left, carefully positioning the letters so they were evenly spaced.  If I wanted to ensure they were evenly spaced across the bottom of the card, I would have put them on a separate piece of cardstock “ribbon” and then center the ribbon after adhering the letters, then trim the edges to the card.
Next, it was a simple tape runner the satin ribbon down, and stick the flowers over the ribbon.
I hate to say it, but I am in love with that colour of ribbon…. I can see myself using it often!
The picture below makes the card stock look tinted on the edges (my camera)... but that would be a great idea, to sponge on a coordinating color along the edges, or in the center of the card to highlight the flowers!


Make sure to visit the Card a Day Blog tomorrow for a card inspiration from Darla!
And check out our challenges there!

Saturday, 5 January 2013

Two Hearts - Together Forever

Thanks for joining me from the Card a Day Blog! This week’s theme is Valentines.

I was blessed to have had my valentine for almost thirty years. Last month my heart was broken.  Sadly this is the first Valentine’s Day without him. I wanted to make a Valentine that would reflect how love can be forever. I hope my card inspires you to make something special for your love too!

I started with some shapes I got through my Silhouette Studio library… Two Hearts, Hearts background, and phrase “together forever”.

Did some welding, and then was going to just do a simple mat around the hearts and phrase, but it didn’t stick out enough, so I layered them on top of the heart background

  • a banner that is plain white, and embossed
  • red striped wrapping paper
  • hearts & phrase cut out on plain white cardstock

Valentine 1Valentine 2

The card’s size is 6 inches square… left plain inside to write my love letter :-) and include a picture or lock of hair.

DSC01993

Thanks for reading about my card.

Make sure to join us at Card a Day Blog for more cardmaking inspiration every day!

Remember to join us for some fun with our January Challenge!


Saturday, 15 December 2012

Happy Snow Day!

Sometimes the best cards in my opinion are the simplest ones! I had some fun with this card, inspired by the frost on my car this morning…. in fact, the frosty background is a picture of the frost on the window shield on my car!

A simple print out, layering, and doodling some snowshoe “prints” across the card front, along with the “happy snow day” sentiment.

Just a little bit of fun, that reminds me how I feel like when it snows (happy and young)!  Remember the most important thing when making cards, or doing anything for that matter…. Have fun!!!

From my car to my card!

DSC01978

DSC01987


We at the Card a Day Blog will be on our Christmas/Winter break, but can hardly wait until January 3rd, when we will be back with more daily card inspirations for you!


<!-- end LinkyTools script –>

Thursday, 15 November 2012

Snowflake Keepsake Card

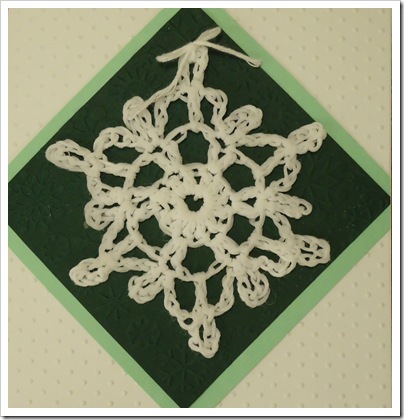
I love snowflakes! They remind me of cold winter mornings, clean, crisp air, and fond childhood memories. Some of my favorite ornaments on my tree are some crocheted snowflakes a neighbor gave me 20 years ago!  I’ve never attempted to crochet one until now, and thought it would make a great embellishment, er….. keepsake…. card!
The card base is  a 5 1/2 inch square, embossed with tiny dots.  The snowflake is tied on another dark green square, embossed with snowflakes. I sandwiched a piece of light green cardstock to “frame” the snowflake mat.
Inside I actually stamped a sentiment (I’m a terrible stamper, and have to practice way more!!!). The sentiment said “Be Merry”.
The snowflake is very easy to do, it is a total of 3 rows, and takes about 10 minutes from start to finish.  It took longer to put the stiffener on it and pull it into shape than it took to make it.  For those of you that can crochet, I’ll put how I made it below.
Enjoy! And thanks for visiting me from the Card a Day Blog! Make sure to visit there tomorrow for another “ornament” inspiration from Michelle Hessler from Paperthreads!
Below: A picture of card front and a closeup of “textures” used.
DSC01973DSC01974

Below, a picture of another snowflake I made before stiffening!
DSC01972

Simple Crocheted Snowflake Pattern.
I used 3 ply crochet cotton, and a 3 1/4 mm crochet hook.

Chain 6, slip stitch together into a loop.
Row 1: Chain 3, double crochet 11 into the “ring”. Slip stitch to the top of the 3rd chain from the beginning of the row.
Row 2: Chain 3, double crochet into the same stitch (beginning of row).chain 4. *Skip a stitch, double crochet 2 times into next stitch, chain 4*. Repeat ** until you have 6 sets of (2 double crochets). Slip stitch the row together.
Row 3: *Chain 4, double crochet into void (between two sets of double crochets). Chain 6, slip stitch into top of double crochet. Chain 4, slip stitch inbetween 2 of the double crochets of previous row. Chain 6, slip stitch into previous stitch to form loop.* Repeat ** until you have 6 sets (and complete row)… slip stitch together and tie off. Secure ends.
Finishing…. use stiffener of choice, and lay flat on plastic wrap or waxed paper. Once dry you can hang on your tree or use on a card or for a gift topper etc.!

Thursday, 1 November 2012

Card a Day Blog ~ Christmas at Home

Thanks for visiting me from the Card a Day Blog!
This week the theme is Christmas from Home. Some of my favorite Christmas decorations include Snowmen, Christmas Trees, and Snow Globes! I pick up a lot of Christmas graphics online, and sadly did not record where I got this snowman snow globe from. But it reminded me of some of my best Christmas at home, so I had to use it! I hope the technique inspires you to look around what you have on your hard drive and have some fun playing and making a card!
The card size is 5 x 7 inches, side fold.
Card base cut from dark forest green cardstock.
“We Wish You A Merry Christmas” song printed on coordinating pale green cardstock. (I got the song “jpg” from http://pinanoandsynth.com
DSC01958
For the snowman snow globe, I had found the graphic online, and printed it out 4 times. I cut it out like this:
DSC01959
All that was left was to assemble with dimensional adhesive tape. The bottom lime green strip was from Christmas wrap that I had used in iris folding cards years ago.
I quite like the way it turned out!
DSC01960
Remember to visit the Card a Day Blog for daily card making inspiration!